
Call Us Today!
(877) 358-5731
Monday-Friday: 10am-6pm EST
(877) 358-5731
Monday-Friday: 10am-6pm EST

Looking to elevate a home's interior with a touch of modern flair? Slat wall panels present a versatile and stylish solution capable of transforming any space.
Whether the goal is to create a chic display area or a functional storage solution, these panels are easy to install and can be customized to match the unique aesthetic of the homeowner.
This article explores the benefits of slat wall panels, outlines the necessary tools for installation, provides a step-by-step guide, and offers tips for achieving a professional finish.
Homeowners can prepare to enhance their living spaces with this trendy décor idea.
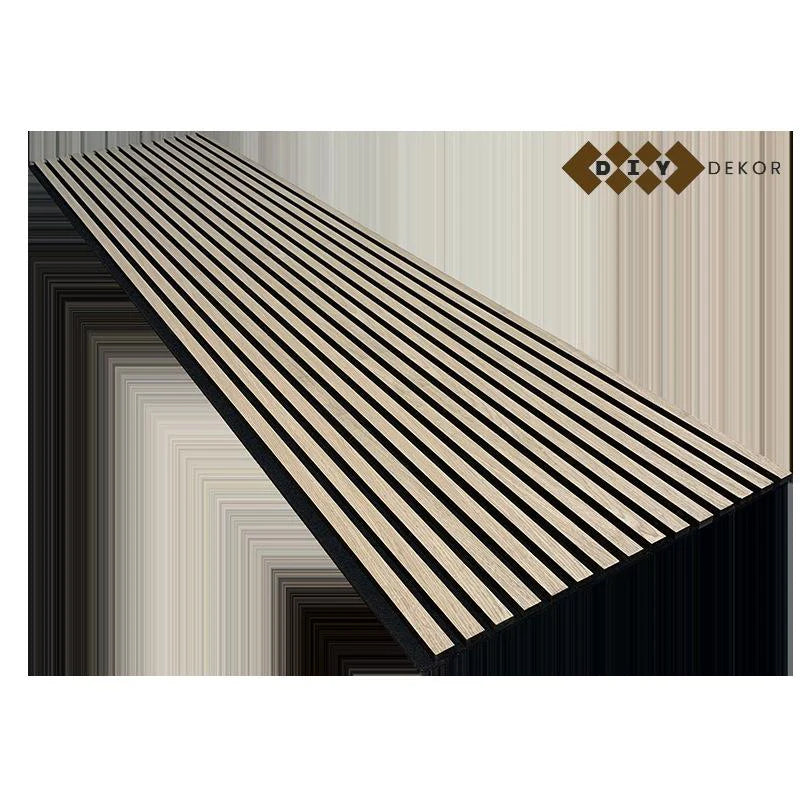
Slat wall panels have become a favored option for home decoration, valued for their exceptional versatility that enables homeowners to enhance their interior design across various spaces, including kitchens, bedrooms, and bathrooms.
These panels offer a range of features that promote organization and creative expression in arranging décor and media, making them ideal for zoning and delineation purposes. Their durable yet lightweight composition ensures a seamless installation process while providing functionality that accommodates diverse design styles and needs.
The versatility of slat wall panels positions them as an ideal choice for any home, suitable for a variety of applications, including serving as room dividers and creating innovative media features.
In kitchens, for example, slat wall panels can be utilized to display pots, pans, and kitchen utensils, elevating organization to an art form while ensuring that items remain easily accessible. In bedrooms, these panels can function as a sophisticated backdrop for hanging jewelry, hats, or even artwork, effortlessly combining functionality with aesthetic appeal.
In bathrooms, slat wall panels offer a sleek storage solution for toiletries and towels, adapting seamlessly to a range of décor styles, from modern minimalist to rustic farmhouse. Given the extensive range of applications, it is evident why homeowners are increasingly attracted to this adaptable design element.
The installation process of slat wall panels is engineered to be straightforward and efficient, enabling homeowners to measure, cut, and apply the panels with minimal effort by utilizing basic tools and adhesives. By adhering to a few simple steps, one can effortlessly transform any space into a functional and stylish area.
Incorporating slat wall panels into a home enhances functionality while contributing to a modern aesthetic that elevates the overall interior design.
These versatile panels can seamlessly work together with a variety of design styles, ranging from minimalist to bohemian, depending on the chosen colors and textures. Homeowners may choose muted tones to create a calming ambiance or opt for vibrant hues that inject energy into a space; the possibilities are nearly limitless.
By selecting slat wall panels in shades that complement existing furniture and decor, individuals can craft a harmonious atmosphere that fosters creativity and comfort. Additionally, the three-dimensional aspect of these panels adds depth, transforming blank walls into captivating focal points while effectively maximizing storage solutions.
Before embarking on a slat wall panel installation project, it is essential to gather the appropriate tools and materials to ensure a smooth and successful process.
This includes acquiring slat wall panels, a measuring tape, a spirit level, and a drill.
Slat wall panels are d durable and versatile components that provide a solid foundation for various installation projects, offering an effective solution for organizing and displaying items in diverse environments.
These panels are available in multiple materials, including MDF, PVC, and wood, each presenting distinct advantages in terms of weight capacity and longevity. Their sleek designs come in a wide array of finishes and colors, facilitating easy integration with existing décor or creating intentional contrasts.
Whether utilized in retail settings to showcase merchandise or in home garages for tool storage, slat wall panels can be tailored with hooks, shelves, and bins to meet specific requirements. This adaptability makes them a favored choice among designers and retailers, ensuring a harmonious balance between functionality and aesthetic appeal.
A measuring tape is an essential tool in any project, as it enables accurate measurement of the area where slat wall panels will be installed, ensuring a perfect fit. This precision is critical not only for aesthetic purposes but also for functionality; improperly sized panels can result in gaps or overlaps that detract from the overall appearance.
Accurate measurements facilitate a smoother installation process, allowing for easier adjustments and minimizing the risk of costly mistakes. By investing time in measuring with a quality tape, individuals can achieve dimensions that contribute to a clean and professional look, ultimately enhancing the overall design of the space.
Ensuring accuracy in dimensions also provides the structural integrity necessary to support any items displayed on the slat wall, making it a vital step in both DIY and professional projects.
A spirit level is essential for ensuring that slat wall panels are installed correctly and aligned perfectly, contributing to a polished final appearance.
The spirit level allows installers to accurately assess the horizontal and vertical alignment of the panels, making it an essential tool for achieving flawless installation. To begin the process, the spirit level should be placed on top of the slat wall panels. If the bubble remains between the marked lines, the installation is level; if it tilts towards one side, adjustments are required.
This straightforward yet effective technique guarantees that all panels are uniformly aligned, thereby enhancing both aesthetic appeal and functionality. By periodically checking levels during installation, installers can prevent future issues and ensure long-lasting performance.
Having a drill on hand is essential for the installation of slat wall panels, as it enables the quick and efficient securing of the panels in place with screws. Among the various types of drills available for this task, a power drill or cordless drill is often preferred due to its versatility and ease of use.
Impact drills can also be advantageous, particularly for heavier installations, as they provide additional torque to drive screws into tougher materials. The importance of using the appropriate drill cannot be overstated; a suitable tool can significantly streamline the installation process, resulting in smoother and more precise outcomes.
It is imperative to consider safety precautions while operating any drill. Wearing protective eyewear and ensuring a stable footing are essential measures for preventing accidents. Additionally, regular maintenance and inspections for wear on drill bits will further enhance both safety and efficiency during the installation process.
Black drywall screws are commonly utilized to secure slat wall panels to the wall, providing the necessary support for a stable and reliable installation.
Selecting the appropriate screws is essential, as their size and type significantly impact the overall stability and longevity of these panels. The correct length and gauge ensure that the screws penetrate deeply into the wall studs, creating a solid anchor point. Additionally, the choice between self-drilling screws and wood screws influences the effectiveness of the slat wall systems in bearing the weight of displayed items.
Ensuring that the selected fasteners can support the intended load without stripping or bending can greatly enhance the durability of the installation.
A stud finder is an essential tool for ensuring safety during installation, as it effectively locates wall studs for securely anchoring slat wall panels. This valuable device not only streamlines the installation process but also significantly minimizes the risk of damaging electrical wires or plumbing concealed within the walls.
By accurately identifying the position of studs, it guarantees that any fixtures or heavy items installed are safe and stable. Users can rely on the assurance that their wall-mounted items, ranging from shelves to televisions, are anchored properly, thereby contributing to the overall integrity of their projects.
Utilizing a stud finder enhances efficiency by eliminating the guesswork typically associated with locating hidden structural elements, making it an essential asset for both DIY enthusiasts and professional contractors.
Installing slat wall panels can be a straightforward process when one adheres to a well-defined step-by-step guide. This guide typically includes measuring, cutting, and applying the panels correctly, ensuring a professional finish in any home.
The installation process should begin with careful measurement and marking of the wall where the slat wall panels will be placed, ensuring accuracy for a seamless finish.
Accurate measurements and precise markings are essential for achieving a professional-looking installation. Using a high-quality pencil to make light yet clear marks on the wall allows for easy adjustments if necessary. It is advisable to utilize a level and a measuring tape to verify alignment, which helps prevent misplacing the panels. Employing techniques such as creating a vertical line as a reference point can significantly enhance the overall appearance of the installation.
When executed correctly, these meticulous preparations not only streamline the assembly process but also ensure that the panels fit together flawlessly, thus contributing to both the aesthetics and functionality of the space.
Using a stud finder, individuals should locate and mark the studs on the wall, as these are essential for providing the necessary support for the slat wall panels during installation.
Properly fastening slat wall panels to the studs ensures that they remain secure and stable over time, preventing sagging or damage. A high-quality stud finder assists in accurately identifying the exact locations of these structural supports, significantly enhancing the efficiency of the installation process.
By simply running the device along the wall, one can save time and minimize the risk of damaging the wall or the panels. Once the studs are located, it is crucial to mark them clearly, which will guide the placement of any screws or anchors required for a reliable finish.
Therefore, focusing on this step has a substantial impact on both the aesthetics and durability of any project involving slat walls.
Once measurements and markings are established, the next step involves cutting the slat wall panels to fit the designated area. This can be accomplished using a utility knife, hand saw, or jigsaw, depending on the specific requirements.
It is essential to select the appropriate tool based on the thickness of the material; thinner panels may be adequately handled with a utility knife, while thicker options will likely necessitate the use of a hand saw or jigsaw. Before commencing any cutting, it is advisable to wear safety goggles and a dust mask to guard against debris generated during the process.
Additionally, securing the panel firmly on a stable surface will help ensure smooth and precise cuts.
Clearly marking cutting lines will facilitate the achievement of clean edges, and utilizing clamps can provide added support throughout the operation, thereby enhancing both safety and accuracy.
To ensure a smooth installation process, it is advisable to pre-drill holes for the screws in the slat wall panels at the marked stud locations. This practice helps prevent damage to the panels during installation.
This step not only facilitates precise alignment but also minimizes the risk of cracking or splitting the material, a common issue encountered during the installation of such components. Selecting the appropriate drill bit sizes is crucial; generally, a bit that is slightly smaller than the diameter of the screws being used will yield the best fit.
It is essential to prioritize safety measures. Wearing protective eyewear and ensuring that the workspace is free from hazards will contribute to a secure environment as the installation progresses. Adopting these practices guarantees a functional setup that is both polished and professional.
The installation process commences with securing the first slat wall panel to the wall using screws at the pre-drilled holes, ensuring that it is level and adequately supported.
To achieve optimal results, it is essential to begin with precise measurements and mark the desired height on the wall. Having a leveling tool readily available will help verify that the panel remains straight throughout the installation process.
In cases where the surface is uneven, utilizing shims can facilitate adjustments for a proper fit. Once the first panel is installed, it is advisable to step back and assess its alignment with the adjoining walls, thereby preventing any misalignment with subsequent panels.
Employing a stud finder can also enhance support, ensuring that the panel is securely anchored to the wall frame. Adhering to these steps will establish a solid foundation for a visually appealing slat wall display.
After successfully installing the first panel, the next step involves attaching the subsequent slat wall panels, ensuring that each one is aligned correctly for a seamless appearance.
To achieve optimal results, it is essential to use spacers between the panels. These small, often overlooked tools create the necessary gap for maintaining even spacing, allowing the installation to progress smoothly without any unsightly unevenness.
By strategically placing spacers during the installation, one can effectively prevent common issues such as warping and misalignment. Utilizing a level can significantly assist in keeping the panels straight and properly aligned throughout the installation process.
Taking the time to carefully adjust and check each panel not only enhances the overall aesthetic but also ensures the durability and functionality of the slat wall system.
To complete the installation and achieve a polished finish, it is advisable to add trim along the edges of the slat wall panels. This step not only covers any gaps but also enhances the overall aesthetic of the space.
Selecting the appropriate type of trim is essential for both functionality and style. Options include standard baseboards, crown molding, or decorative casing. Each type can impart a distinct character to the environment, ranging from contemporary to traditional aesthetics. To ensure a professional appearance, precise measurement is crucial; utilizing a tape measure to ascertain the length of each panel edge is recommended, with careful consideration given to corners.
When cutting the trim, employing a miter saw will ensure precision, particularly at angled joints. The installation of the trim can be accomplished using finishing nails or adhesive, facilitating seamless integration. This approach not only conceals imperfections but also complements the interior design in an effortless manner.
Achieving a professional finish during the installation of slat wall panels requires adherence to specific tips and techniques that enhance both appearance and functionality.
This includes ensuring proper spacing and applying paint or stain prior to installation.
Utilizing a spacer during installation ensures even spacing between slat wall panels, which is essential for achieving a consistent and visually appealing appearance. This simple yet effective tool enhances both the aesthetic quality of the display and contributes to the structural integrity of the installation.
There are various types of spacers available, including plastic, metal, and foam options, each designed to meet different requirements and preferences. For example, plastic spacers are lightweight and resistant to moisture, making them suitable for areas prone to humidity, while metal spacers offer sturdiness and durability for heavy-duty applications.
By employing the appropriate type of spacer, individuals can maintain uniform gaps, ensuring that everything from hooks to shelves fits perfectly and operates as intended.
To save time and ensure a polished finish, it is advisable to paint or stain slat wall panels prior to installation. This practice enhances their appearance and provides protection against wear.
This approach streamlines the installation process and allows for better control over the finish, as handling smaller panels is generally easier than managing larger sections that have already been installed. When selecting a paint or stain, it is recommended to opt for high-quality, durable products specifically designed for wall applications. For instance, water-based paints typically dry quickly and offer easier cleanup, while oil-based stains deliver a rich, deep finish.
Employing techniques such as spraying or using a foam roller can help achieve an even coat, minimizing the visibility of brush strokes. Ultimately, pre-finishing not only enhances the aesthetic appeal of the panels but also extends their lifespan, making them more resilient to fading and wear.
Utilizing a level during the installation of slat wall panels is essential for ensuring that the panels are straight and properly aligned, which contributes to a professional and polished appearance. This process not only aids in achieving visual symmetry but also significantly impacts the overall functionality of the installation.
Moreover, employing additional techniques, such as measuring from a fixed reference point to monitor alignment throughout the installation, can further enhance accuracy. Regularly checking spacing with a measuring tape is crucial for maintaining consistency in the installation process.
This meticulous attention to detail is vital, as uneven slat wall panels can compromise the intended design and create challenges when attaching shelves or hooks in the future. Ultimately, maintaining straight lines is fundamental to achieving a seamless final look that endures over time.